Sunday, March 31, 2013

Chicken and egg nail art for Easter!

Happy Easter! I felt like getting one more Easter mani in before I have to pack away my colourful pastels. I wanted to do another look with the new butter London spring polishes and this is what I came up with:


Fiver is a gorgeous mint green and although it's looking a little bluer above, I can assure you it's minty goodness.


I really felt like I needed 3 coats of Fiver because it was a little streaky. Oh how I wish it was spring here, but alas we are heading into autumn and winter.


Obligatory over filtered and prettied up instagram shot above. Today was one of those 'start painting and see where it takes you' days. I didn't think chickens would quite fit on all nails so I decided to finish with eggies. The brown used was actually another button London polish fave of mine - Yummy Mummy.

Well that wraps up Easter nail art, I hope you enjoyed them! Now time for CHOCOLATE! Until next time...


Wednesday, March 27, 2013

Easy Easter Egg Nail Art How To!

Hi everyone, it's time for the 2013 Easter Egg mani. For this look I wanted beautiful pastels and what better collection to use than the butter London 2013 Spring collection (despite the fact it's autumn/fall here :-) 4 of the colours made for a simple yet beautiful Easter egg nail art:


Butter London have 6 spring shades out and while I originally bought the purple, pink and yellow, I just had to have the mint green and some others... but here we have the four used in the look above, all prettied up with my new Easter decor from Bed Bath and Table:


No filters have been applied in the first nail art image at the top of this post so use that as your guide. I would swatch but I have eggs on my nails ;-) The pink is called Fruit Machine. Hmm is that related to the Neopets Fruit Machine I wonder (which I WON this week after 10 years of playing, hmph I mean yay?) The yellow is called Jasper, the purple Molly-Coddled and the mint green is called Fiver. Beautiful opaque cremes but I would say that the yellow needs a white base if being painted over another colour.


Step 1: Paint your base colour. I chose Molly-Coddled, the purple because I love purple, no other reason! It applied beautifully opaque in two coats. Cleaned up really nicely too. Can't say that about all polishes.


Step 2: Draw a white base in a half egg shape. Ideally use a small nail art brush (or even a mini polish brush) to draw the outline and fill with your regular paint brush.


Step 3: Repeat step 2 but leaving a small white border to make the yellow pop a bit more. Also, the yellow wasn't as opaque as the other colours and needed a white base to really bring out the yellow. But you could choose any colour as your egg colour.


Step 4: Take a small nail art brush and draw short zigzags or continuous Ms from one side of the egg to the other. Somewhere in the middle ideally, mine were a bit too high up I think. I chose The pink for the top zigzag. Fruit Machine is beautiful, I really need to wear it on its own.


Step 5: Repeat step 4 just under the first zigzag with another colour. I choose the mint green Fiver.


Step 6: Use the large end of the dotting tool to dot below and above the zigzags. The last step is to switch to the smaller end of the dotting tool and fill with your desired colours. I went pink on top and mint green on bottom, ties it all together nicely. And that is it!


And lastly we have my Easter haul. Please someone hide my credit card, Bed Bath and Table had 50% off their Easter range and I got a few things :-) They are actually for my wedding next year! The eggs were the only real Eastery thing I bought, the rest were just pretty and pink. Of course there are some new OPIs (I needed a new Alpine Snow and I bought a full size of Don't Burst My Bubble as I plan to use it for my wedding day). Aaaand I bought two new season Pandora charms, sigh.

Well I hope you enjoyed the post and hope you have a wonderful Easter long weekend! Until next time...

Monday, March 25, 2013

Easter Bunny with Carrots nail art!

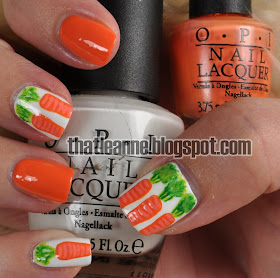
I'm feeling inspired this Easter so I decided to go for an orange look for my first Easter mani. And what is orange? Carrots! Yes, I decided to upgrade from my previous silly carrot nail art and go with a more, er, respectable look. Ha I do not know it was midnight ;-)


I wasn't originally planning on painting bunnies, I quite liked the half carrot look I finished with late last night:


But I have some spare time this week so I decided to continue on with bunnies!


Then I just drew the outline/silhouette of bunnies and I really liked THAT look but I have this incessant need to draw eyes on things ;-)


Which is why I added some pink ears/feet and drew a small face. Not the best face I've done but still super cute. Well I hope you enjoyed this look and I'll see you next time!

Sunday, March 24, 2013

OPI Oz The Great and Powerful Collection Swatches

It's not often I buy entire OPI collections and half of these are really these are minis but I thought I'd swatch them since they are so pretty! Excuse the broken nail on the middle finger, I love it how I can go a whole week with perfect nails then break one an hour before I plan to do swatches.


All swatches are two coats except for the skittle mani bottom left above which simply had one coat of Lights of Emerald City.


First we have I Theodora You, a light cream pink that is somewhat streaky to apply and needs a little extra care when painting.


Next we have Don't Burst My Bubble, a pale cream pink that is beautiful to apply and wear. I'm getting married this time next year and I'm seriously considering a full size of Don't Burst My Bubble as my wedding mani. Serious contender here. It's like having a subtle french mani without having tried hard.


Third we have Glints of Glinda a light tan cream which is easy to apply.


Last of the minis we have What Wizardry Is This? This is a liquid sand polish in a blackened gold. It's not as bumpy and annoying as I imagined it would be and it applies wonderfully.


The first glitter polish I'm showing is When Monkeys Fly! over What Wizardry is This? Huge gold glitter chunks with two smaller sized glitter pieces. It's gorgeousness speaks for itself.


Second glitter polish is Which is Witch? Small holographic silver glitter chunks with little shards of the same. Very pretty over the creams. This is shown over I Theodora You.


The last glitter polish is Lights of Emerald City which I bought last as it was sold out originally. Unique white chunks of glitter which will obviously be a royal pain to remove like all glitters but lovely over the other polishes:


My personal faves are Lights of Emerald City over I Theodora You and Don't Burst My Bubble. One mani from last week (from instagram):


Well I'm all swatched out. Hope you enjoyed the swatches and I'll see you next time :-)

Sunday, March 17, 2013

St Patrick's Day Nail Art - Pot of Gold

Hi everyone, long time no post :-) Happy St Patrick's Day! I wasn't planning on doing any nail art, I was just painting my nails with OPI Mermaid's Tears. Later I felt like getting into the St Patty's spirit...


I don't own a lot of greens that I'm prepared to wear on my nails for fear of staining but I know OPI is a pretty safe brand to use. I chose Mermaid's Tears from the Pirates of the Caribbean collection to wear this weekend.


I also wanted a chance to use When Monkeys Fly from the latest Oz collection and although the glitter chunks were a bit too big for my lil pots of gold, they were still good when mixed with Sephora By OPI's Only Gold For Me top coat:


I really wanted to do shamrocks this year as well but I decided to go with all pots of gold. Anyway, hope you enjoyed the nail art and I'll see you next time :-)