Hey everyone! I am going away this weekend so I thought I'd post another Halloween nail art look earlier than usual. This time we have a plain ole ghost with a twist - it glows in the dark! Looks awesome with or without the glow in the dark polish:
If you're interested in seeing how I created this look, keep reading!
The materials used for this look were pretty simple. Left to right we have OPI Zom-body to Love, I Only Date Werewolves and Alpine Snow. I also use the same small nail art brush as usual. Let's get started!
To start off I painted my nails with two coats of OPI I Only Date Werewolves and cleaned the edges a little.
Next I just googled ghosts and tried to find some cute cartoons of ghosts. I tried a few designs before I was happy with this one. At this stage I simply took the nail art brush and did a rough outline of the ghost in OPI Alpine Snow. It does not need to be super neat as the white will be filled and you can always tidy the outer edges with more black.
After the outline was done I filled with the same brush.
When the white was dry I used the same nail art brush to draw the eyes of the ghost on each nail. The left eye was slightly smaller and rounder than the right eye. And they were kind of jelly bean shaped on the right.
After the eyes I drew a larger sort of jelly bean shape for the mouth. And you could stop there! The white against black is simple and effective. But if you want glowy nails, continue on...
Next I tested one nail with the glow in the dark polish to make sure a light layer was effective for the glow. You only need a thin layer of glow in the dark polish, you don't need full on green (or whatever colour glow in the dark polish you are using).
This is what it looks like with a thin layer of Zom-Body To Love. I used the same nail art brush to lightly go over the white parts of the ghost (being careful going around the eyes and mouth!) It would be great if I used a clear glow in the dark polish as the green doesn't look as good as white. I don't know if that exists!
And that is it! Looks a little scream-ish now that I'm staring at the glow in the dark version. Simple ghost nails for halloween that glow in the dark! I spent a lot of time playing with the manual settings on my camera and have a variety of shots but I liked the full dark shot the best.
Anyway I hope you enjoyed this look and try it out. I'm off to Brisbane for the weekend so I will see you on my return! Have a lovely week and weekend everyone :-)
Wednesday, October 26, 2011
Sunday, October 23, 2011
Spooky haunted house nail art for Halloween!
Halloween is still a week away so I thought I'd add another nail art idea - this time haunted house nails!
So this look was a little bit time consuming but relatively easy to do! Big shapes and not too much fine detail.
This is what I used. Left to right we have OPI Alpine Snow, Funky Dunkey (purple), I Only Date Werewolves and Sally Hansen Yellow Kitty. And of course my trusty nail art brush.
First of all I painted my nails with 2-3 coats of OPI Funky Dunkey. I was looking for a dark blue creme but I didn't have one! But I think purple works just as well.
Using a small nail art brush I drew circles in the top left hand corner of the nails. And filled as neatly as I could. This was using OPI Alpine Snow.
I wanted to do big haunted mansions on the rest of the nails but there wasn't a lot of room - I settled for simple houses and I used the same nail art brush to draw and fill the outline of a house. I also drew the ground in black with OPI I Only Date Werewolves.
Next I took the same brush and drew the doors and top windows in OPI Alpine Snow. Then I filled and tidied up the edges. This was to make a nice bright base for the yellow polish.
Next I filled the doors and windows with Sally Hansen Yellow Kitty. If you look closely at the brush in the picture above you can see a little pointy tip. That's what I dip my brush in to get the really tiny lines for the window panes. So little polish is required!
And that's with the window panes in place! And I actually finished here last night but I felt there was something missing. So this morning I added bats and eyes to the thumb :-) And we are done! I hope you enjoyed the look and are able to try it out yourself! I'm off to eat some chocolate. Have a lovely weekend everyone (what's left of it :-) and I'll see you next time!
Wednesday, October 19, 2011
Mummy Nails Tutorial for Halloween!
Hey everyone! I'm glad some of you liked my Mummy Nails from my last post, I have a quick piccy tutorial where I show you the tools I used for this look at each step. We are aiming to achieve these happy mummy nails shown here:
And let us begin!
Above are the materials I used. Left to right we have OPI Alpine Snow, A-taupe the Space Needle, French Quarter for Your Thoughts, Fiercely Fiona and I Only Date Werewolves. At the front I have the 3 nail art tools I used and you'll see them more clearly below.
First as the base I used OPI's A-taupe the Space Needle but you could use anything really.
Next I took this flat wide nail art brush and used OPI Alpine snow to create the head shape. Basically start small, get bigger than go smaller again. About 5 overlapping strokes.
After I used the flat brush to get the shape, I filled in the head with a small nail art brush.
Next I used the same nail art brush to carefully outline the head shape. This was using OPI French Quarter For Your Thoughts. I outlined the top two bandage layers and the bottom layer. The next step was to get the 'cross' bandage by drawing a double line and joining it up with the second bottom layer. Then halfway down that first diagonal bandage, draw another double line connecting to the second bottom layer.
I felt that the mummy heads didn't contrast enough with my background so I drew a thin layer of OPI Alpine Snow around the mummy heads so that they would stand out more. If you choose different colours, you probably won't need to do this!
Next I used my Orly dotter to dot two eyes on the face in Alpine Snow, then the small nail art brush to draw a happy smiley mouth.
Using the same dotter I went over with OPI Fiercely Fiona to give the mummies nice bright eyes.
Then using a black polish (I Only Date Werewolves) I drew very faint outlines around the eyes and mouth. Then one line through the mouth for the smile. And when that yellow dried I put a final 'dot' the centre very lightly with the small nail art brush - and that's it!
Anyway, I hope you are all having a lovely week and found this somewhat useful! Halloween is just around the corner so hopefully I can squeeze in another post. We shall see! Until next time...
Sunday, October 16, 2011
OPI Touring America swatches and some Mummy Nails for Halloween ;-)
A couple of months back I purchased the OPI Touring America mini collection. Then I decided I wanted more and purchased a full size of some of the shimmers. A bit late given that we're halfway through a season but better late than never :-)
Left to right we have some shimmers from this collection - I Eat Mainely Lobster, Are We There Yet? and My Address is "Hollywood". Then to the right we have the mini set with again, My Address is "Hollywood" (I love that colour and needed a full size!), French Quarter for Your Thoughts, A-taupe the Space Needle and finally Honk If You Love OPI. Now there are 12 colours in this collection but I don't love Fall/Autumn colours as much as Spring colours so I thought I'd skip the others. Onto the swatches!
Above is I Eat Mainely Lobster. 3 coats. The shimmers from this collection are subtle but still pretty.
Above is Are We There Yet? Again all these swatches are 3 coats. If you go to the opi website, you can see the cities these colours represent.
Above is My Address is "Hollywood". I like this one the best. It's pink, it's shimmery. A little bit dusty and maybe I just liked the name too! There is one more shimmer (a red/berry one) but for some reason I managed to not buy it!
Above is French Quarter for Your Thoughts. Representing New Orleans apparently. I've never been there but I loved the Disneyland and Legoland versions of it!
Above is A-taupe the Space Needle. This comes out a little darker than what appears in the bottle. I have been looking for a good brown to replace my Essie Mink Muffs. This is a bit more of what I was after.
Finally we have Honk If You Love OPI. A deep purple wine like colour. It was frustrating to clean up and if you have Lincoln Park After Dark, you might not want this. This one appears lighter and a bit purplier but still similar.
And that is it for the swatches! I wanted to do some nail art that was USA themed but it's October and I'm in the Halloween spirit so I did mummies:
Silly isn't it? But I like it! They are friendly mummies. Well that is all I have for now, hope you enjoyed the swatches! I might try and put up the tutorial for this a bit later, but I hear the washing machine calling. Until next time my lovelies!
Monday, October 10, 2011
Simple Halloween Nail Art ideas
Hello! I am typing this post in between internet dropouts, apparently the ACT has been having some serious connectivity issues all long weekend. All I know is that I haven't had net since Saturday and I'm about to go insane! So in my boredom newly found freedom from the internet, I painted my nails. Twice.
Here is a simple recreation of one of my previous Halloween posts where I did spider webs.
The design is so simple. Black base, which in this case is OPI I Only Date Werewolves from the 2011 Halloween collection and OPI Alpine Snow. I started by making a cross with my usual small nail art brush, then another cross in the other direction. Then I painted two lines of webs in between the lines. So simple yet awesomely Halloween.
I kinda wanted to put a spider in but there was no room! Maybe if I had longer nails. I recently had to cut them all short and now they are only just starting to grow back. So this works for short nails! If you have really long nails you could drop a line down and have a spider on the tip of the nail. That would be cute.
Next up we have bats. And batty is exactly what I go when I have no internet! And I kinda stuffed the thumb but putting that awful OPI rapidry over black polish. Black was dragged everywhere. I was not happy.
Here is my thumb before I destroyed it! The base colour is Sephora by OPI Yes Your Lioness from the Safari Luxe collection. It isn't really a good Halloween orange but it was the closet one to me at the time. In fluorescent lighting, it looks pink! Very strange.
So for the other fingers I couldn't really fit two bats so I just drew the outline for one with a small nail art brush and Illamasqua Boosh.
Then I filled with black and dotted white for eyes! I did not use a dotter because I needed really tiny dots so I just lightly tapped with the same nail art brush.
And that is it for now! My skeletons are keeping me company at my desk. They are awesome. I need more. Anyway, I hope you enjoyed these simple looks! I am eager to go into the dollar store tomorrow and get some Halloween decorations. I'm feeling festive and I cannot wait for Christmas! I need pumpkins stat. Hope you all had a fantastic weekend and I shall see you next time!
Monday, October 3, 2011
icanhascheezburger nail art?!
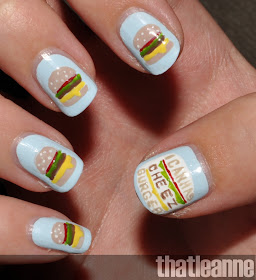
Hello lovelies! I was expecting to swatch many things this weekend instead I found myself drawing burgers on my nails. I blame my co-worker who encouraged me to do McDonalds burgers but I found myself at icanhascheezburger.com - the source of many kitty lolz. And hence this:
There are a few colours required for this look. I used a range of goodies and left to right we have Illmasqua Smash, Throb, Essie Mink Muffs, Playa Del Platinum, Borrowed & Blue, Sephora by OPI Don't Feed The Hand Models (I think!) and OPI Fiercely Fiona.
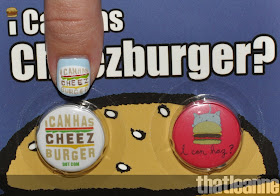
Now originally I started with a different burger design until I wound up at icanhascheezburger so I ended up redoing my thumb at the end:
I painted my nails initially with Essie Borrowed & Blue. Still gorgeous. Just a pain to apply with such a small mini brush. Need full size asap.
So with a small nail art brush I drew the bottom of the burger with the Sephora polish. Then a line above it with a slight indentation on the bun so that I could paint yellow cheese over it - and have it look melted (as per the icanhascheezburger logo).
Then after I filled with yellow I drew another short line across with Essie Mink Muffs to resemble the meat.
Two more thin strokes for the lettuce and tomato (or ketchup?!) and we're done for the fillings!
And a rounded dome on top and lightly dot (I did not use a dotting tool, just lightly tapped with OPI alpine snow on the edge of my nail art brush) for sesame seeds. And we're done! Well almost - I had to redo the thumb:
Didn't quite estimate how much room I would need on my thumb and I have very short nails right now so it was a bit of a tight fit. But you get the idea.
My stash of stuff. I got these for a birthday a few years ago. I also have one of the kitty shirts. The thing in the middle is a case of magnets with icanhascheezburger style words.
And finally what icanhascheezburger nail art post would be complete without a picture of my precious kitty, wacky. You can probably see why he is named that. I love him to bits.
Well that is all I have for now! I am off to floriade tomorrow so I am excited to finally get some sun (and I hope there IS sun) otherwise I'll be getting my vienna macadamia nuts and running away back to the warmth of my house. I hope you are all having a lovely weekend and I'll see you next time!