Monday, December 24, 2012

Christmas Eve Candy Cane Nail Art

Hi everyone, I've been away but I couldn't let Christmas pass by without a Christmas nail art mani :-)


I've not worn nail polish in a very long time. My nails grew to unsightly lengths with rugged edges and I just said 'Enough! I need to be pretty!', and this was the result.


I started with butter London Knees Up which a beautiful metallic red. I don't have many reds so it was an easy choice. I then sparklified it with OPI Gettin' Miss Piggy With It from the OPI Muppets collection of 2011. I originally stopped there, then the bf smudged my thumb nail so after I repainted it, I decided it needed more...


So armed with my $3 colour changing Christmas tree and Marshmallow Fireside from Bath & Body Works (which I ordered from eBay, I wanted a full size of the mini sampler I picked up overseas last year) I got to work. It didn't take me that long actually, I have done candy canes twice before (Advent 2010 and China Glaze Holiday 2010)! I just love the look.

No progress shots as I was motoring speedy gonzales style (so much cooking to do Christmas morning tomorrow!) but I have a couple of left/right hand shots:


My ambidexterity is a work in progress.


No SLR shots either but I tried to make them pretty in a few iPhone apps: picframe, picfx, bokehful and snapseed if you're interested. Loving my new iPhone 5 and you can really do a lot with those apps. So much fun to use too!


That's the Christmas table setup I've been working on. Most courtesy of Target except the place mats, candle holders and the Christmas coasters! How I'm going to fit the food on there tomorrow, I have no idea. Anyway hope you enjoyed the post, and have a wonderful Christmas. Happy Holidays everyone!


Sunday, September 16, 2012

Easy Lady Beetle Nail Art!

Hi everyone! I have a cute little design that's super easy to do - lady beetles!


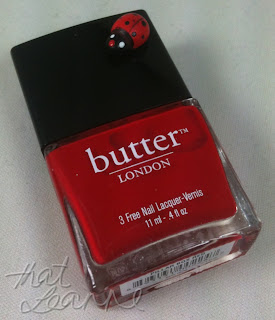
So in Australia at the moment InStyle magazine is giving away two different butter London polishes with their latest issue and I picked up a gorgeous red called 'Pillar Box Red':


*Lady beetle not included :-) I found that little lady beetle when I was clearing out a box the other day and I thought it would make a super cute nail design. Anyway, we pay at least $20 to buy butter London polishes from authorised retailers! And for $8.95 to get a butter London polish included is an awesome deal. I don't own many reds so this makes a nice addition to my collection:


This polish is simply gorgeous. It's a little runny to apply so be careful around the edges but I only needed one coat!


As usual not much is needed - I prep with Sally Hansen Vitamin E Nail & Cuticle oil and use the Double Duty Base & Top Coat. I used three nail art tools - a hard wide brush to clean around the edges of my nails with Acetone, a small nail art brush to paint the lines and face, a dotting tool and two more colours, an opaque black and white polish.


So this design doesn't take that long to do I promise! The hardest part is probably trying to get a straight line down the nail in step 2 shown above. The curved head in step 3 is simply outlined with the nail art brush then filled with the polish brush (a mini bottle helps with smaller areas). Step 4 alternated between the large and small ends of the dotting tool. You can also apply less polish or gently dot to get a variety of sizes.


The last two steps are super easy - step 5 is a little tricky if you use a nail art brush to get that oval shape but I think you could also use the dotting tool and drag the colour around to make a bigger circle. Step 6 simply uses the dotting tool to dot the two eyes on each nail and hey presto you're done!


Kudos to the bf for taking this last picture and patiently listening to my Hipstamatic app instructions ;-) I have been running around the house like a crazy girl with my hands extended going 'lady beetle power raaaaaaaaaaaah!' Too much nail polish fumes perhaps :-P I really like this design but since I was copying my little beetle decoration I thought of different things I could have done afterwards - perhaps there needs to be a lady beetles part 2 down the track here! Anyway I hope you enjoyed this look and try it out for yourself. See you next time!


Sunday, September 2, 2012

Minnie Mouse Bow Nail Art!

Hello everyone! *insert face of shame*. Well. Apparently I needed a break and perhaps I'm still on one but I couldn't resist sharing today's efforts. I picked up the OPI Vintage Minnie Minis from David Jones a few weeks ago and while I've made a few posts on Instagram (my latest obsession) I did my first nail art in months today.


All photos were taken and edited on my phone (I have an old crappy iPhone 3GS but I love it to bits) so excuse the quality.


This is the original colouring / no filter version. Unfortunately there was no "anti-aging/anti-winter cracked fingers filter" :-(


The Minnie minis set contains 3 Minnie polishes and a mini top coat. Yep, a RapiDry instead of the gorgeous glitter polish with heart glitter that I had to go buy separately. Poor form OPI. I purchased a full size of the glitter and the pink used in the second photo:


Left to right we have The Color of Minnie (a shimmery red used in the bows for this nail art), If You Moust You Moust (opaque bubblegum pink also used as a base for my nails), I'm All Ears (a pink/red shimmer) and a RapiDry. I have full sized If You Moust You Moust and Nothin' Mousie 'Bout It (pale pink glitter with heart confetti). While I'm on the subject of the heart confetti, I *knew* it would be a pain to work with from my experience with the Nicole by OPI version, but it was pink and pretty so I had to have it.


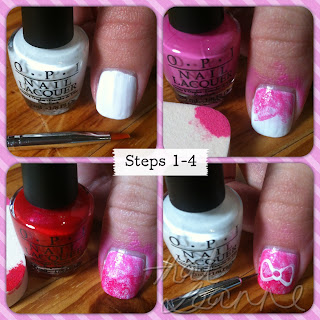
So today I felt like sponging and this is what I was working with. A dotting tool, two nail art brushes (the bigger one for cleaning up the nails and fingers), a makeup sponge, 3 OPI colours (The Color Of Minnie, Alpine Snow and If You Moust You Moust), acetone and a make up remover pad.

Steps 1-4

I started with the thumb before I changed my design - originally I sponged The Colour of Minnie at the bottom of my nail but I decided I liked the white contrast better. I always draw the outlines of my bows first. Even though it takes so long I always do them the same - outline then fill, then fill again! I'm not very good at sponging but I'm determined to practise!

Steps 5-8

By about step 7 I'm shaky and cranky but it's all worth it in the end!


I couldn't resist a creepy Minnie shot ;-) I picked her up in Disneyland last year and had no idea she would be so useful for nail art! Anyway I hope you enjoyed the nail art, and I hope you all have a lovely week!

P.S. If anyone is interested, the iPhone apps that I used to make this blogpost were Hipstamatic, PicFrame, Picfx and A+ Signature. I took SLR photos but I really am lazy so they are still on my camera...


Sunday, April 8, 2012

Easter Bunny Nail Art 2012!

Happy Easter everyone! I realised I did this post last year but I really wanted to try my Chanel May polish. So I did bunnies again :-)


I fell in love with Chanel May as soon as I saw it. Maybe the April polish would have been more appropriate but this pink was too gorgeous to pass up. Here it is more true to colour:


It's a warmer pink which suits me better and I believe that is about 3 coats.


We also got a new photography toy. This is the Remote Release Cord and it makes self portraits a little easier but it also helps with hand/nail art photos. I like it.


So to do the bunnies I used a few of my minis - Essie Splash of Grenadine for the nose, OPI Pink Friday for the ears and an OPI black and white (from the Halloween mini sets).


I really like this colour, so glad I got it. I really like June too but I don't know if I would wear an orange as much :-)


Our choccy stash this year! Ahh hopefully I can give some of it away otherwise I will be getting VERY big :-S


Anyway this morning we decided to make heart shaped pancakes with our heart shaped egg rings! They turned out pretty well!


Anyway that's all I have for today! I hope you are all having a fantastic long weekend and are enjoying a choccy egg or ten :-D See you next time!

Sunday, March 18, 2012

St Patrick's Day nails!

Happy belated St Patrick's day everyone :-P It was yesterday for us here in Australia but I wanted to quickly show my nails before I get back to cleaning my house for an upcoming inspection :-\


That's the hipstamatic version :-) The green base used was Sally Hansen Green With Envy and the four leaf clovers were Illamasqua Smash. I painted Green With Envy over a white base to make it a bit brighter but it was pretty opaque already. A version a bit more true to colour:


I used two gold polishes for the pot of gold: OPI Glizterland and Sephora by OPI Only Gold For Me top coat (has big glitter chunks).

Anyway I hope you enjoyed the look and I am loving all the other St Patty's posts I have been seeing today! Check out paint that nail, aly loves lacquer and nevorpurify's to see their awesomeness! That is all I have today, better get back to cleaning! See you next time :-)

Sunday, March 11, 2012

Watermelon Nail Art Take Two!

Hi everyone! So I went to Lush a few weeks back and I noticed the lovely lady serving me had watermelon nail art. I'd done *actual* watermelon slices before but I thought I'd try and recreate these ones that I saw with my lovely new butter London polish Primrose Hill Picnic:


Now of course if you have seen butter London Primrose Hill Picnic, you'll know it's very much pink and not red, I just took that picture using Hipstamatic on my iPhone. The actual colour is more like this:


And it's beautiful! I love it. Unfortunately when I ordered this polish online (with two other lovelies from the new collection) I was actually sent Queen Vic instead. Yuck! Well, it's not yuck, it's just not my colour, I had my heart set on this colour so I quickly returned it and got the correct one sent. Whew!

So if you are interested in doing this popular look, I did a quick how to:


Firstly I came to the quick realisation that I didn't have a nice light green to use for the inner part of the watermelon so I went with pink :-D Well I could have used the same one from my last watermelon nail art post but I wanted a nice light colour. I ended up using Pink Friday from the Nicki Minaj collection. Secondly I did another shorter tip with Essie Pretty Edgy. Thirdly I used another polish from the Nicki Minaj collection for the watermelon skin detail - Did It On 'Em. I originally chose another colour but it didn't contrast well with the Essie colour and you can probably see if you look closely. Lastly, I used a black polish to draw little seeds on the nails.


And that is it! I realised after I did the thumb nail that the other nail tips needed to be more rounded. Otherwise a pretty simple look to recreate! I wish I had asked the nice girl at Lush what colours she used.

Anyway I hope you enjoyed the post and are having an awesome long weekend if you're lucky enough to be having one :-D I think Canberra and Vic have holidays tomorrow. I'm off to have dinner and play some online games. See you next time!

Sunday, February 12, 2012

Valentines Bow Nail Art How To

Valentines Day is coming up this week so I decided to bust out the pinks and draw some pretty bows. This has been done time and time again but I couldn't resist! And I wanted to use the hot pink Zoya Ali that I picked up from Ulta last year (and still hadn't touched). So I came up with this:


Zoya Ali is a hot hot pink that looks red on the nails but over white comes out very fluro pink as you can see on the bow:


Can you believe it's the same colour!? It's much more pink in real life, the flash makes it a lot warmer and I couldn't adjust the white balance enough to make true to colour. Fluro pink is hard to pick up on camera. It makes me wonder if this is the 'Ali' used in the Pretty Little Liars intro where they paint the dead girl's nails since her name was Ali. I should google it. Oh there is a whole site dedicated to the nail polish of PLL! Wow! Hmm I don't know, the base nails in the picture sort of look white enough to bring out the fluro-ness but the formula isn't that thick. This polish came out Summer 2009 and the show started in 2010. But I digress, this was three coats of Zoya Ali. I got a little distracted haha ;-)


Firstly I dotted the centre of the bow with OPI Alpine Snow. I used a dotter on the other nails but I drew it on the thumb as it needed to be a bit bigger.


Then with my trusty nail art brush I drew the two sides of the bow, outlines first.


Then I filled the bows.


This 'last' step is probably the most time consuming part. I shaped my brush to a very fine tip with nail polish remover and carefully dipped the brush in the polish and lightly drew the bow detail. I started with the dots in the middle then worked on the little ovals down the bottom and finally worked around the outline set by the white. Added some strokes in the middle to make it look 'creased' then that was it! It looks a lot harder than it was, it was just drawing fine lines.

I also decided against adding the ribbon hanging down on the nails because I thought I didn't have enough room. If I started my bows higher up I might have been able to make it work. Instead I'll keep the thumb as the 'feature nail'.

Anyway I hope you enjoyed the look and have a fabulous Valentines day if you celebrate it :-) We will probably go for a picnic next weekend since the weather this weekend has been too rainy. I plan to consume a lot of cheese, weeeee. See you next time!

Sunday, February 5, 2012

Kikki-K inspired ice cream nails!

Wow where did January go?! I went on a bit of a blogging hiatus recently. I took some time to relax and get back into the new year. And it was good. I got back into exercise, spent less time online, watched a lot of vampire diaries and played a massive amount of Tiny Tower on my phone. But I have something to share today! Around this time last year I did a similar ice cream nail art post but this year mine were kikki-k inspired! If you have a kikki-k nearby or peruse the online store, you may have noticed their sundae line. So cute! And I really really want this USB drive but I guess I'll have it in nail art form first ;-)


I don't normally do white nails but I felt like something different for "summer". What summer you might say if you live in the southern hemisphere. Indeed, we've been ripped off!


So this is about three coats of OPI Alpine Snow. I spent so much time cleaning up my nails and treating them with lotions and cuticle oil that I almost stopped at this point because it was so much effort!


The first colour used to draw the outline of the ice creams is a Sephora mini. I believe it is don't feed the hand models as shown from last year's post. I stuffed up one of the outlines and had to go over with alpine snow. A top coat will fix all mistakes, so it's all good.


Next I filled the bottom ice cream layer with OPI What's With The Cattitude. It took a few coats, it wasn't quite as opaque as I would have liked over that Sephora.


The middle layer consisted of the same Sephora colour as the outline. I kept a white line in between and went over it with more white where I made mistakes. I went for a beige instead of pastel yellow here. I thought yellow might not contrast with the white enough. And quite frankly chocolate is MUCH better than banana :-D


The top layer is Essie French Affair and it's a lovely light bubble gum pink.


I filled the ice cream "sticks" with Essie Mink Muffs but I didn't like it at first and covered the thumb with the Sephora to make it less brown. I think the Essie is fine by itself but I would have used a lighter colour if I had one. After the sticks add a final top coat and that is it!

Anyway I hope you enjoyed the post and had a fabulous new year. I'm going to go play more Tiny Tower (I cannot believe how addictive that game is). Have a wonderful week everyone and I'll see you next time!

Related Posts Plugin for WordPress, Blogger...