Saturday, January 29, 2011

Chill out with ice cream nails!

Oh where to begin with this. This must be the most random design I've done. I wanted something like summer fruits but it didn't work out so I went back to the drawing board and ended up with ice cream nails ;-) And it was a process but eventually I got there:


These super cute nails were a bit of effort! First I'll show you the colours I used:


Left to right we have China Glaze Snow from the holiday 2010 collection, Essie Demure Vixen, Knockout Pout, Splash of Grenadine and Lapis of Luxury and finally Inglot O2M polish in no. 631. Whew! What a list.


To start off with I painted Essie's Lapis of Luxury and Splash of Grenadine to the left and right of each nail. These stripes were 2-3 coats, then I did a stripe of China Glaze Snow down the middle (using the side of the brush so it wouldn't be too thick), again about 3 coats. I finished off with a top coat, Seche Vite.

Next part was a bit tricky. I drew the outline of the ice cream cone on a bit of paper and used that as a guide of what I wanted to end up on my nails. Then I used an Orly detailer brush to draw the outline of the ice cream tops (easier to start with the ice cream in case you make your cones too big), filled in with the brush and painfully waited for it to try and repeated 3-4 times. Then I did the same for the cone. For the ice cream I used Essie Knockout Pout and the cone was Demure Vixen. I added a lattice type effect to the cone to give it that 'waffle cone' look with Inglot 631. So after a lot of effort I ended up with this:


I was going to stop there but I decided to add some dots to the ice cream with China Glaze Snow to bring the ice cream more to the foreground. I felt it was getting a bit lost in the stripes :-) And voila! Pretty ice cream cone nails (natural light shot below):


Even though it took a bit of effort, I love this design. And you can make it work with any colour, I wanted mint choc chip to start off with but by the time I figured that out it was too late ;-) Well I hope you enjoyed this look and try it out for yourself! I'd love to see alternative colours. Have a lovely weekend everyone and I'll see you next time.

Wednesday, January 26, 2011

Tropical Island Summer Nails for Australia Day ;-)

Happy Australia Day! Since summer has finally landed (it's currently 36.5 degrees outside !_!) I decided to do some tropical island nails, using OPI and Essie creams:


Cute hey! Yeah a little messy but here we have palm trees, beach and blue sky. For this look I used the Shrek OPI mini set again, this time with What's with the Cattitude as a base, with a half moon of Fiercely Fiona for sand. Then the trunk of the tree was Essie Playa del Platinum and the tree tops were Essie Pretty Edgy:


I used the Orly dotter again to draw the trunk and tree tops but you could use a nail art brush if you like. I find the dotter is better for opaqueness while the brush streaks a little.


I wanted to do more 'sand' with a bit of a layer of the yellow and a lighter green over the dark green tree tops but I think it looks nice as it is. Sometimes simple is best ;-)


Natural light shot above. I really love this design! Now I hope everyone has a fantastic Australia Day if you're celebrating and a great week ahead. I'm off to get food ready for the BBQ :-D Until next time...

Saturday, January 22, 2011

Flirty Heart Nails for Valentine's Day

Wow you should see the storms we've been getting today. I wanted to do some appropriately themed dark heart nails but alas, the inspiration wasn't there. So I busted out my favourite colour (purple) and decided to make use of the Shrek Mini OPI set I got last year:


Yes a little messy and of various size, but the good thing about drawing them on with brushes / nail art tools is that you get to pick your colours. And I love these two from the Shrek Collection:


I painted my nails with Rumple's Wiggin', drew some heart outlines with a Sally Hansen nail art pen (originally started with brushing China Glaze snow but the pen worked out better), then filled with What's With The Cattitude. Quite like the result actually, very flirty and cute. Natural light shot below:


This purple/lavender is so pretty! The formula is brilliant and I kinda wish I had a bigger bottle now...


I think the thumb heart came out best as I had the most room to work with. Would be super cute for Valentine's Day... ;-) So what else is happening? Well since I recovered from my virus I decided to steal the bf's new BBQ Cookbook and make a cous cous salad. We recently got a new BBQ so we're all set to go for a barbie on Australia Day next week:


I will be taking care of the salads so decided to test run a cous cous recipe in the book - which was pretty basic:


Salad, some herbs, lemon rind and a LOT of cous cous. I'm quite annoyed really because Woolworths used to make the BEST cous cous salad with roast pumpkin and fetta cheese and now they have stopped making it and have replaced it with a red onion capsicum version that quite frankly, sucks. Boo to you Woolworths :-| I should try to make it actually. But anyway, this turned out nicely and I would probably have less parsley next time and maybe some fetta @_@


Well this storm is making me a teensy bit nervous so I'm going to get off the computer and light some candles! Until next time...

Friday, January 21, 2011

MAC Soirée and a Happy Anniversary!

Well, sort of. I've been off sick this week with my THIRD illness since boxing day. Dr thought it would be best to just banish me from work so I would stop infecting and re-infecting myself :-/ Now that I'm less coughy I thought I'd try out MAC Soirée from the Cham Pale collection. Looks promising:


Oh yes indeedy look at all that glitter. Microscopic shimmer that gets all over your fingers and is a pain to remove.


Soirée is a frost and comes out pretty much as it looks on the bottle:


I'm not entirely sure why I purchased this. I had heard comparisons to Orly's Rage and thought well I don't have rage I may as well get this one. But *again* I received a MAC polish with an utterly crap brush with bristles sticking out everywhere, making it extremely difficult to apply. Given that this is my second MAC polish to have a defective brush in my very small collection of MAC polishes, I am not impressed. Maybe they should stick to their eye shadows and leave the nail polish to the brands that know :-)


The colour is pretty though. But honestly, after the MAC Venomous Villains polishes, I think my expectations are still too high and anything after is going to fall flat. Onto something much more bright and prettier!


These are from the bf. They are anniversary / get well soon flowers I think :-) Just gorgeous, I love pink roses and the pink lilies make it perfect. So I put it on top of my jewelry armoire that I got for Christmas:


I had been admiring this in store for some time and the bf was sneaky and got it for me for Christmas. It was funny because he got it quite in advance and I was so disappointed when my mum came to visit and I tried to show her the armoire but it was gone! Little did I know :-)


Well that's it for me today, hope everyone has a fabulous germ free friday and a great weekend. Until next time...

Sunday, January 16, 2011

Flower Power Nails for Spring

Ok it's not spring yet and it's still summer here in Australia - although I would question that as I can count the number of days I've had over 30 degrees on one hand. Since I don't feel like it's summer I decided to play with my Orly Dotter Duo and create some flower nails:


Isn't it pretty! I'm more impressed with the colours than the actual flowers, they work so well together. This nail art look combines Orly Limelite, Essie Turquoise & Caicos, Essie Haute as Hello and Essie Splash of Grenadine. The Essie Polishes are from the Summer and Resort 2010 collections. And it was a bit of effort to get there but let's go:


You will need nail polish! I chose the four mentioned above. You could skip the glitter over Essie's Turquoise & Caicos but I love shimmer and the blue-green of limelite adds a lovely shimmer.


You will also need a dotter tool - above is the Orly Dotter Duo which has two different sized 'dotters'. I used the bigger one on the left only.


So first I added 3 coats of Essie Turquoise & Caicos. Beautiful cream finish isn't it. Then I added a layer of Orly Limelite to give it a bit of sparkle:


Then I applied a layer of Seche Vite and left my nails to dry. You want them to be completely dry when you use the metal dotter because it can very easily dent wet nails.


I then used the dotter to first create the center of the flower with Essie's Haute as Hello. Then I wiped the dotter clean and carefully placed dots around the centre dot with Essie's Splash of Grenadine. When it was dry I added a final coat of Seche Vite.

Well I hope you enjoy the look and try it out yourself. Until next time...

Currently listening to: Dirty Talk (Laidback Luke Remix - Wynter Gordon LOVE this version!

Wednesday, January 12, 2011

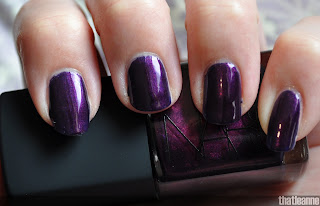
NARS Purple Rain for the well... rain

It's been raining all week (and sadly flooding back home in QLD) and my NARS Orgasm mani only last 3 days... washing the dishes bare hands will do that... Anyway, in keeping with the theme of NARS this week I present to you Purple Rain:


I picked this up along with the Orgasm polish because I was just dying for it. Then I left it in the closet for 7 months and forgot about it (mega sigh). This is a very dark purple polish and looks much darker in natural light:


Very dark and very purple. But it has a faint blue shimmer as you can see in the first flash shot and a little bit here:


And what a coincidence, the Glee version of Umbrella/Singing in the Rain just started in my iTunes. Well there you go.


Isn't the purple swirl in the bottle just gorgeous? I don't know how anyone could have resisted picking this up at the time (I believe it came out Spring 2010). Oh I'm a year late (sigh). Whooooops.

Well I haven't been around much this week. Too busy worrying about my friends and family in Brissy dealing with the floods. So far they are all good and have found higher ground. I just can't believe how nasty the wet season has been to QLD these last 5-6 years. If it's not floods, it's cyclones.

Anyway, I want to leave you on a lighter and happier note (well not happy for me, I was not impressed). Snails ate my darn mail:


I really hope this mail isn't important. FFS is all I can say...

Sunday, January 9, 2011

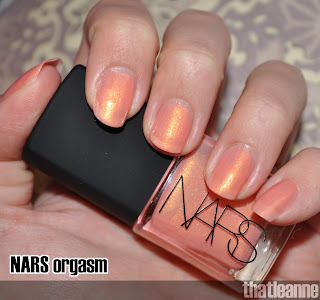
NARS Orgasm Nail Polish for back to work nails ;-)

I'm going back to work tomorrow (sigh) and decided to try out the NARS orgasm nail polish. It looks very pretty in the bottle which translates beautifully onto the nails:


Flash shot above. Omg this polish is gorgeous! I used three coats and you can see it's still a bit sheer but that gorgeous peachy shimmer is just stunning. I don't know whether or not this lives up to the blush version but this colour is still something special. Natural (fading) light show below:


I don't believe this polish is available (easily) in Australia - while Mecca stocks NARS, they don't offer the nail polishes which quite frankly sucks. I picked mine up at Sephora last year, along with one of their spring polishes.


The NARS nail polish comes in a square bottle with 15mL or 0.5Fl Oz which is pretty much standard (same as OPI, Sephora by OPI, Essie, Illamasqua...) so more than MAC (10mL) and Chanel (13mL) but less than Orly (18mL). It retails for $16USD so quite a hefty price tag for USD but hey, if it was in Australia we'd probably be paying something like Chanel prices :-/ So while the dollar is close to parity, buy online and be happy :-D

On a side note, I'm really longing for kittens. I'm not allowed kittens yet but when the time is right, I'm getting two ragdolls pretties, much like these:


Aren't they just adorable.

Thursday, January 6, 2011

Illamasqua Boosh with a touch of winter...

I recently purchased Illamasqua Boosh and while the black is just stunning on its own, I decided to play with some craft punches to make a snowflake stencil. This is the result:


The snowflake has Orly Cosmic Kiss as a base which was used to capture the MAC pearl glitter (from the MAC A Tartan Tale thrillseekers cool pigments/glitter set).


These were all the products I used (missing the cotton tips and scotch/sticky tape):


The snowflakes came out surprisingly well for a first go! Here's a close up of the snowflake with and without flash:


So in love with this glitter art right now :-)


If you're interested in recreating this look and have some small scrapbook punches lying about, just follow these few steps:

  1. Apply 2-3 coats of nail polish then set with Seche Vite
  2. Take a piece of tape and very carefully punch it with a craft punch of your choice. Make sure it isn't too big for all your nails - the snowflake barely fit on my other nails!
  3. When you're sure the base polish has set, stick the tape stencil to your nail
  4. Take a clear/sheer polish and 'fill in' the stencil shape
  5. While the polish is still wet, quickly use a cotton tip and dip into the glitter and tap over the wet stencil
  6. Layer on as much as you like and brush off any excess.
  7. Very carefully peel the tape off - you might want to start from one side, stop at the middle then start from the other side.
  8. Finally when the stencil is off, add another layer of Seche Vite to set the glitter.
  9. You may be able to reuse a stencil for another nail but it's just as easy to stamp a new one for each nail.
Note - the final top coat will dull the glitter significantly, so you might want to try an alternative glitter base and/or add more glitter before the top coat.

Well I hope you enjoy this look and while it isn't winter here in Australia, we haven't had much of a summer with all the rain... so this dark look suits me well :-) Until next time...

Wednesday, January 5, 2011

Oh Mr Postman! Merry Christmas to me :-D

Ah no I won't start quoting B*Witched lyrics. Am I the only one that had their first album? Anyway this is what happens when you go away for two weeks and don't check your mail. The post office people know me by name and it was a little funny going in to pick up 6 packages :-P Some were for the bf though but this is what I scored:


As soon as Benefit's new blush Bella Bamba came out, I ordered it, along with a few other goodies as you can see. The box powder is different to earlier versions as the lid no longer detaches and there is a little mirror inside. Pretty shiny reflective box:


And inside... described as a 3D watermelon blush so it'll be interesting to see how it compares to their standard blushes.


I also picked up the Illamasqua nail duo boosh and harsh:


I can't wait to try boosh. I don't have a black so this is exciting for me :-) I also ordered two Philosophy shower gels, firstly Rainbow Sherbet:


This smells fresh and fruity and is great for summer. But I couldn't resist also picking up cookies and cream:


It does smell oh so sweet so probably doesn't appeal to all. I don't mind it given my recent candle haulage.


And I just had a lush bath to finish off the second Pretty Little Liars book. I'm DYING to see episode 11 so hopefully I can watch that tomorrow. But I'll probably start getting the book and tv show mixed up so I better finish off the books quick smart!

TMI time but I'll show you what a 'halloween' Lush bath bomb Calavera looks like when dissolved. Oh looks pretty and pink in ballistic form:


Read the fine print and it says '... turn bathtimes (and halloween) into a real celebration!' Well if by celebration you mean creature from the black lagoon style then yes:


When you combine blue and yellow and orange flower petals you get creepy green bath with bits! Luckily it still smelt nice. Honestly it was no way visually appealing or inviting but it smelt like lush so it's all goooooood.

P.S. You all need to reminisce and get on the b*witched :-)
Related Posts Plugin for WordPress, Blogger...