Saturday, April 30, 2011

Katy Perry Purr inspired Nail Art!

Hi everyone, I have a something a little silly this evening! I picked up the cutest perfume this week and was inspired to do some kitty nail art:


Ok it's not exactly purr-fect ;-) but it's my take on the gorgeous kitty perfume bottle that is Purr by Katy Perry:


Isn't it adorable? It has a little heart charm as a collar that sort of jingles like a cat bell :-P


The packaging on the right slips over the silver box on the left. I ended up purchasing the large 100mL bottle because they had a sale (at both David Jones and Myer) where if you buy the large 100mL EDP, you get a free Katy Perry tote bag:


Ahhh it's so loud isn't it? I do wonder what her nail art is but I can't quite tell on the bag. I can maybe see pointed nail tips though. Hmm it kind of looks like purple print of her outfit. As for the bag, it's a little more subtle on the back...


And on the inside are cat paws as the print :-) Super cute!


I won't go into the fragrance itself and the notes, perfume is very personal and while I've heard people love it, I don't think it's all that. I'm still going through my Marc Jacobs Lola phase and nothing seems to smell better than that :-) But I do like it in case you are wondering...


Above are the materials I used for this look. I was inspired by the purple and pink colours of the perfume packaging. My two favourite colours were calling to me and I had to use my favourite OPI: Flower to Flower. I hadn't used Funky Dunkey (from the OPI Shrek collection) yet so I was happy to find a use for it tonight. Illamasqua Glory and Boosh were used to draw the finer cat details like the collar, eyes and the base (where I was trying to replicate the perfume bottle a bit).


Progress shot above. Flower to Flower as the pretty shimmer base and Funky Dunky as the kitty.


A close up shot of the thumb. My take on the perfume bottle was to add a tail, obvious front paws and more defined eyes. Oh and if you're wondering why the purple is a little shimmery, the thumb is always the trial nail so I ended up getting silver mixed in with my purple trying to correct a mistake :-P The rest of the nails are more purple, no shimmer.


Oh dear, I've been getting a little too addicted to my iPhone app hipstamatic... But now we have black cats! Well anyway I hope you enjoyed the nail art. I love cats and purple so eventually this nail art was going to end up on my blog in some form or fashion. Have a fantastic weekend everyone! I need to hit the gym and work off a whole week of choccy overdose. Yet I still have more @_@ Until next time my lovelies...

Wednesday, April 27, 2011

Firey Autumn Leaves nail art

I must thank Vita for inspiring me to do a fall/autumn themed post. I don't have as many lovely autumn coloured polishes as her so I thought I would take the few cremes I have in the orange-red range and do something 'firey'. And so I ended up with this:


They are they outlines of maple leaves drawn over a fire base which looks like this pre maple leaves:


This fire look was relatively simple to do as I'll demonstrate. First I started with a red base and I chose MAC Scorcher which is a cream polish but it is quite transparent and reminds me of the OPI sorbet colours released in the Texas collection.


And if your eyes are burning from that colour it's because I forgot to switch back to standard in picture control :-P I painted over it before I realised it was still set to Vivid, haha.


With a fan shaped nail art brush I took an orange creme (OPI flit a bit) and used the polish brush to paint colour onto the nail art brush. This made the bristles separate into 'flames' of colour, giving the effect shown below:


After cleaning the brush I did the same effect slightly lower to the base of the nail with OPI Fiercely Fiona to achieve the fire effect shown above. A second layer was required to make it more opaque.


Then using Illamasqua's throb, I carefully outlined maple leaves which got a little squished on the other nails but the thumb looks good. I tried.


So these are the polishes used for the look plus the two nail art brushes - a straight small brush and a fan shaped one. That is it! Oh and a top coat of course. Now the boyfriend and I are very much into photography, and while we are amateurs we still managed some pretty Autumn leaves shots which almost makes me like autumn despite its closeness to winter :-P Hopefully I can inspire others with these pretty autumn piccies...


A bit of Photoshop action above ;-)


One of my favourites - autumn leaves and blue skies.


Found a whole line of red trees. Just stunning aren't they. Pity the leaves fall off so quickly!


Autumn up close and personal.

Well that is all I have for now. Sadly we're up to that stage where the leaves are falling off and the days are shorter and the nights are getting colder. Winter is almost here... sigh. Well I hope everyone had a great long weekend, it wasn't long enough if you ask me :-D Until next time...

Saturday, April 23, 2011

Easter Egg Basket Nail Art!

Happy Easter everyone! Woo! One of my favourite holidays. It's cute, it's pastel, it's springy, it encourages us to eat lots and lots of choccy and to celebrate we have Easter egg basket nail art:


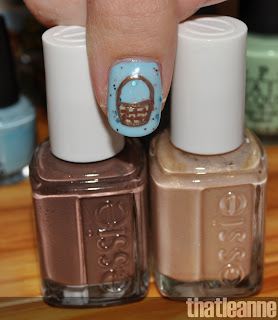
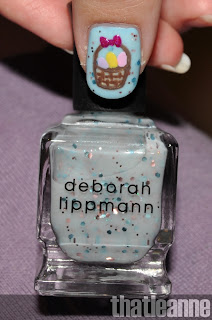
So I figured I had done everything leading up to Easter in terms of nail art - bunnies, chickens, eggs... time to conclude with some cute baskets of eggs. And while it was a bit of effort, it was actually not that complicated. I'll take you through some progress shots. First I started off with a blue base which was OPI What's With The Cattitude layered with something very special and have been dying to share: Deborah Lippmann's Glitter In The Air:


Every since I saw the Deborah Lippmann polish go up on the website I was looking for it. Finally got a hold of it and have been waiting for the right look to use it. I think it's very pretty when layered over blue.


Once the base was dry I drew the outline of the basket with Essie Mink Muffs, filled the middle of the basket with Essie Chips No Potatoes and when that was dry, did the basket weave pattern inside.


The thumb is usually the 'trial' nail so I used OPI Flashbulb Fuchsia to draw a bow then drew three eggs in the basket using OPI Rumple's Wiggin', OPI Fiercely Fiona and Essie French Affair (shown left to right).


Decided that looked ok so decorated the eggs with white polka dots, blue stripes and pink zigzags and added some grass using a combination of Essie's Pretty Edgy and OPI Gargantuan Green Grape. Then I drew the baskets on the other fingers and did the same as what was on the thumb nail.


Whew what a lot of polishes! FYI the egg polka dots were China Glaze Snow, the stripes Essie Coat Azure and the zigzags Essie Splash of Grenadine. And I think that's it! Whew.


Close up of the thumb above. Excuse my icky dry fingers. You don't put a lot of hand care effort in when you're coughing all over place :-P


Aren't these cuuuuute? I bought some baskets because I think I'm going on an Easter Egg hunt tomorrow :-) They are from a dollar shop so they weren't very expensive but I couldn't decide between the two so I got both. And a little basket to carry around with me on my hunt. Someone my age can still go on Easter Egg hunts right? Hehe. Well I hope you enjoyed this look and that you're having an awesome Easter long weekend (we get 5 days with Anzac Day Tuesday so woohoo :-) Until next time my lovelies...

Wednesday, April 20, 2011

Sally Hansen Yellow Kitty or Yellow Chicky?!

Easter is fast approaching and why not get into the spirit with some Yellow Chicky oh I mean Yellow Kitty :-D


I'm talking about Sally Hansen's Yellow Kitty and it's a pastel yellow creme nail polish that's perfect for Spring (or the Easter season as I'm going to call it since it's Autumn here :-) They didn't turn out quite like I hoped because I honestly thought the yellow I used for the chicken heads hidden inside the egg was going to be much darker. What chicken you say? Yeah, exactly :-|


Yellow Kitty (#420) is sadly not as opaque as I had hoped, the swatch below is 4 coats! and even then I wanted to add another due to slight patchiness.


So I was trying to 'save' the art and decided that surely glitter would make the chickens stand out better:


I used Orly's Groupie to go around the chicken/eggs but it was a little too subtle. Oh well can't win them all!


The colours used for this look were fairly simple - Base coat was Yellow Kitty, the eggs China Glaze snow, the chickens OPI Fiercely Fiona, and Sephora by OPI Leotard-Optional for the eyes/beak. Then of course Orly's Groupie around the outside as mentioned above.


So I decided to redo my thumb with what it probably should have been (a darker background) but I don't know, I like the subtleness of the yellow kitty background better.

So what chicken post isn't complete without actual chickens? :-D I don't know if I've mentioned this but I'm a huge bird lover, probably because I grew up with chickens from an early age.


This is our last chicken from about 2008. We've been breeding them on and off for many years and decided that this would be it. Unfortunately this cutie turned into a Rooster... a pity because we already had two... and roosters don't mix ;-)


And his mummy/daddy is probably in the photo above! We purchased some fertile eggs in 2004 (a mix of polish and silky breed) for our very clucky chook Lily to sit on. She did a brilliant job. We've also used an incubator but found that a hen does it better :-)


One of our polish hens all grown up :-) They love to dig big holes all around their pen.


What you lookin' at punk? Scary yet very cute :-P Well that is all I have for now, hope everyone is having a great week - mine has been shocking. Saturday I came down with a nasty head cold and Sunday I got the stomach flu. So when you combine fever + runny nose + stomach bug... oh my gosh I was not a happy girlie this week. Hopefully your week has been MUCH better than mine! Until next time...

Saturday, April 16, 2011

Easter Egg Nail Art and new Pandora goodies!

Easter is almost here and I thought I would get into the spirit with an Easter Egg mani :-) The inspiration was an Easter card as shown here:


I started with the thumb nail and went from there :-) I used so many colours I don't even remember now! But the base is OPI Gargantuan Green Grape:


Here's a better swatch of the colour on the progress shot:


I don't know what inspired me to use a green base, it seemed 'Springy' and cheerful (even though it's Autumn here haha) and well suited to Easter. And it sort of goes with my new Easter goodies from Myer (they were having a buy 2 get 20% off sale):


I bought this because I thought it was a bunny (wasn't looking too closely). It isn't now that I look at it now... looks more like a bear to me... I fail :-| Is it a dog? It has a bunny tail though >_< I have NO idea now that I think about it! But I loved the egg shape plate and while they had two designs I had to get the pink one :-)


Ah yes more Pandora. I was getting annoyed with my two charms going all over the place so I decided to buy some clips and I already wanted the dice charm.


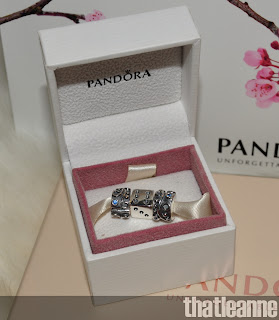
So here we have the dice charm and two blue cubic zirconia clips. It's odd, I'm not the biggest blue fan but the blue spoke to me and I had to have them. I got a dice charm because of an online game I'm obsessed with right now (er Heroes of Newerth) and you can roll a dice to random a hero to play. I random a lot :-D I was a big fan of Warcraft III, played the custom corridors map for YEARS then discovered HoN. I'm not into World of Warcraft but I like this game. It's full of scary angry ragers though :-S Gaming online with complete strangers is certainly an interesting experience to say the least... I have a user ban list the size of a phone book haha. But I digress...


This is my pandora charm bracelet as of now! I LOVE it. It is starting to look more like a pandora charm bracelet and the clips keep the charms in the middle from moving to either side. As you can see on the top there's room for more clips but I'm not sure what will go there. We will see when I fill it up more :-)

Anyway, since I spent a certain amount at Pandora I got a gift with purchase. He mentioned that he was including a notepad and I was thinking oh must just be some plain white note pad (like the pen I received last time). I was surprised when he pulled out a Pandora box, unwrapped some very pretty pandora tissue paper and revealed this!


I was just @_@ at that for some reason. The tag says genuine leather so that can be removed. But if you open it up it's a lined notepad:


Nice isn't it! Those clips were pretty expensive (certainly wasn't expecting to buy ones that cost that much) but overall I'm really happy with the purchase. Anyway, I hope you enjoyed the post and hopefully I didn't ramble on too much. Have a fantastic weekend everyone! What plans do you have for Easter next weekend? I'm going to avoid all traffic and craziness and stay right at home :-D

Related Posts Plugin for WordPress, Blogger...