Friday, February 25, 2011

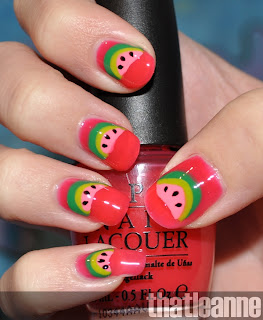
OPI Texas Collection: Guy Meets Gal-Veston... with Watermelons?!

I couldn't resist - I picked up another sorbet polish from the latest OPI Texas Collection. In the shops it looks exactly like another in the bottle. I don't remember which. But the swatches were showing Guy Meets Gal-veston as more pink and it was pretty. So I went to work... and I kept thinking of watermelons for some reason? I know it's been done to death but maybe not like this :-D


Guy meets gal-veston looks pink painted over white, but comes out more deep coral pink on the nail. Like watermelon @_@


I'm a big fan of the 'sorbet like' finish from this collection. Regular flash swatch below:


Looks quite pink there. But less so in natural light but that might be my room light affecting the colour:


The watermelons were pretty easy to draw. Two crescents, filled with pink and dots for seeds. Easy. Progress shot below. I used Essie Pretty Edgy and OPI Who the Shrek Are You for the outside of the watermelon:


I actually have a full size of Who the Shrek Are You. Honestly I have no idea why but I'm glad I found a use for it ;-) I'm left handed so the left hand was the 'trial' hand and the right is better looking. They are super cute though and I received some compliments out shopping so that was nice :-)


Natural light shot below:


So for this look I used Essie Pretty Edgy for the first crescent, OPI Who the Shrek are you for the second crescent, Essie Knockout Pout for the watermelon part and Illamasqua Scorn for the seeds.


Well I hope you have a great weekend and enjoy the look. I rarely keep nail art on for too long but this one I'm really loving so why not? ;-) Until next time...

Tuesday, February 22, 2011

China Glaze Crackle Fault Line swatches and new Pandora goodies!

I recently ordered one of the China Glaze crackle polishes - Fault Line. It's a gorgeous purple shimmer. I was hesitant to order anymore 'crackle/shatter' polishes after the trouble I had with the OPI Black Shatter but the purple called to me :-) So here we have Fault Line:


And the little card attached has instructions in three different languages:


Basically you need to wait until the base coat dries. Otherwise it's going to be a gooey mess. I decided to go with OPI Coronation DS as a base coat. Silver and purple - can't go wrong right? And it turned out gorgeous:


It is matte until you put the top coat on but I wanted to show you both. I mangled the ring finger but it still turned out pretty. But again, I love purple and am biased so I'm going to put that out there :-D Swatch with top coat shown below (which clears up said mangled nail):


I love this effect in purple. Black was very harsh but purple gives it a whole new look. I feel the formula was different to OPI but the more you use it the more it's going to dry up the top of your bottle and be hard to screw the lid back on. Shatter/Crackle dries incredibly fast. I had heard that Fault Line is the 'thickest' of the China Glaze crackles so I used a very thin layer for the swatches above. I'm wondering whether or not I need anymore of the crackles. I was very temped to get the pink one... but am still undecided. Will it be as pretty? On a side note I visited Pandora recently:


It's the bf's mum's birthday soon so I picked up a charm for her bracelet. Then as I was looking at all the charms I spotted one that I fell in love with. So of course I needed a bracelet to start my own charm bracelet. I'm such a sucker for cute miniature things :-| This is what I picked up for myself:


A standard clasp silver bracelet (which is a royal pain to open - do I need the clasp opener?!) with a silver oxidized Cancer charm. The product description says it's black but it comes off more blue in real life if you can tell above. I love it. I'm thinking silver and purple charms would be really pretty as a theme for the bracelet. I would love a gold one too but I'm holding off on buying the expensive gold bracelet until my USA trip in August. I think it's a bit cheaper overseas (if the dollar stays strong). Do any of you lovelies collect Pandora charms/have a completed bracelet? I would love ideas :-) Well that's all I have for now, I hope you enjoyed and until next time...

Thursday, February 17, 2011

Illamasqua Jeweled Apple Nails feat Throb, Untold and Harsh

So I am really in love with Illamasqua Throb. But I love glitter too :-D So I added a layer of Illamasqua Untold over Throb, and got to drawing ;-)


Apples! I drew the outline of the apples with a white Sally Hansen nail art pen, and filled them with Illamasqua Harsh:


I was looking around for a green glitter polish to use when I realised I had the perfect sized 'leaf' like gems in this craft pack I bought. So I stuck those on as apple leaves and Voila! Oh - the only annoying thing about using the Sally hansen nail art pens is that they crack easily. So a number of layers would be good. I had to fix up a few after the top coat. Thumb shot of the apple below:


I have a few other piccies to share with you. Excuse the quality, I only had my iPhone :-/ I went to dinner for Valentine's day weekend (before Valentine's Day) at a lovely restaurant called Rubicon:


I hadn't been before but the menu looked nice online. We were seated in a little corner at the end of the building:


But behind us was a kind of function room with fairy lights:


And the food? Well I had the Roasted chive and potato gnocchi:


Very filling and very tasty. The bf had the Lamb fillets with delicious polenta chips (so nice):


I would have had that had I know it was so delicious :-D And for dessert we had the dark chocolate mousse with a date cake base in cherry sauce. So. Darn. Good.


Well I hope you enjoyed the apples and food piccies! All I can say is TGIF tomorrow. I've had a dreadful week (had to cancel the credit card due to the Lush hacking drama then I had a number of dentist issues which I couldn't pay for initially due to Lush incident). Now my face hurts a lot! Woe is me. I'm really looking forward to the weekend and I hope you all have a lovely Friday and that your week has been MUCH better than mine! Until next time lovelies...

Monday, February 14, 2011

Lush Frog Prince nails for Valentine's Day!?

Erm I'm almost embarrassed to post this but I felt I had to after spending so long drawing these cute little froggies on my nails :-D


What the?! You say. Indeed. I showed you those lush bath ballistics I bought the other day and I just kept staring at the Frog Prince bath ballistic... So I drew a little frog on paper and got to work... I started with my thumb:


I chose Essie Mint Candy apple as a base because I didn't have a lime green (shocking I know). Then I drew the outline of the frog with Essie's Pretty Edgy. The belly is OPI Fiercely Fiona, the whites of the eyes China Glaze Snow and the rest was drawn with black and red Sally Hansen nail art pens.


Back to the bath ballistic! I was hoping it wouldn't be a sickly yellow/green bath since it *was* part of the Valentine's collection. It was more green this time:


And that red dot are the lips floating around... which melted into the oily drops below:


Which you need to mix up otherwise you're nice and red :-D


Well no bath is complete without some nice scented candles! I love the homemade cookies Slatkin & Co from Bath and Body Works. It's not overpowering which suits my poor migraine prone head and it's just nice and sweet smelling. Win. Oh I almost forgot! The frog prince ballistic has a surprise inside:


There's your prince! Happy Valentine's Day everyone, have a lovely day and I'll see you next time :-)

Saturday, February 12, 2011

Illamasqua Game of Love nails for Valentine's Day!

I have been feeling quite inspired by Valentine's Day this year so I decided to do another round of Valentine's themed nails this time using Illamasqua Scorn (matte black) and Throb (striking red cream):


I call this look 'The Game of Love' and I love it! Scorn was used as the base (matte black but top coat is used above) and the formula is just superb. Two coats and no streakiness. So quick and easy. I then used a Sally Hansen white nail art pen to draw the game cards and hearts around the cards. Then a red nail art pen to do the outline of the centre heart, filled with Throb. Then tried to carefully draw the rest of the ace of hearts with a nail art brush :-) The only thing I'm annoyed about is that my aces are back to front! Should have been top left, bottom right. Whoopsie. Here's a pre top coat version so you can see the mattey goodness of Scorn:


I would have loved to keep this matte but Sally Hansen nail art pens need to be top coated else they'll simply wash off :-( Pretty simple look, not so many colours this time! All you need is shown below.


Pretty easy to recreate, especially if you have a steady hand. Here's a close up of the thumb:


Happy Valentine's Day weekend everyone! I'm off to sleep for a good 12 hours straight :-D Have a fantastic weekend and I hope to see you next time...

Thursday, February 10, 2011

Illamasqua Cupid Heart nails for Valentine's Day!

I recently picked up the Illamasqua Throb nail polish collection and decided to play with Load and Throb to create some Valentine's Day cupid heart nails:


We have Load as the cream colour base with Throb used to paint red hearts. Then I used some glitter polishes from OPI to draw the little arrows on. I finally finished it of with some white dots around the hearts (originally had gold dots but the pen was much darker than I thought). The OPI polishes used were Glitzerland and Bring on the Bling over the top of the Glizterland arrows. These are the only products I used (minus the Seche Vite top coat):


I tried those cheap nail art brushes and the one in the picture wasn't bad actually! Short brush so it didn't move too much and a good thick handle. The nail art pens were Sally Hansen. Gold and White. But I'm going to skip the gold on the weekend since it didn't stand out enough. Here's a close up of the design:


Cute! Well I hope you enjoy this look and have a very happy Valentine's Day next week (or this weekend if you're celebrating early like me!) Until next time...

Sunday, February 6, 2011

Katy Perry OPI Black Shatter - swatches and other experiments

If you missed part one of the Katy Perry swatches you can view them here. I have the elusive Black Shatter polish. It's hard to get a hold of in Australia - David Jones is still waiting for their order and I don't believe it's up yet on Adore Beauty (but you can pre-order it). For over a month now David Jones has been saying 'next couple of weeks' and their waiting list in the city has over 20 names on it. I got mine online :-D


First things first, let's do the Katy Perry polishes with black shatter. Starting with Teenage Dream since it's the prettiest of the lot and worth buying (I purchased a full size of it because it's made of awesome):


This was 3-4 coats of Teenage Dream plus one quick swipe of Black Shatter.


Next is a ridiculous number of coats and still no blue colour pay off. This is Last Friday Night with Black Shatter.


Next we have Not Like The Movies with Black Shatter. These have no top coat so you can still see the matte finish of the black shatter.


Lastly we have The One That Got Away with Black Shatter. So you can see the Black Shatter finish is different every time and you need to be quick as it dries so fast! Two coats and you'd probably not get a shatter effect. Too thin and it turns into vertical stripes. I find it really annoying to apply actually. I don't know why it's so hyped up :-/ Especially since China Glaze is releasing coloured versions of the shatter formula. Let's look at some other polishes with Black Shatter since I was having fun playing this week:


China Glaze Snow with Black Shatter. I thought this would be a nice contrast and it was my first attempt at using Black Shatter. It was a bit of a fail :-S


Next I was looking for a cheetah kind of colour scheme so picked out Ignot O2m in 631 and added Black Shatter. Then I accidentally mangled the thumb!


And lastly I tried it over OPI's Austin-tatious turquoise. Honestly I'm just shattering everything I paint my nails with lately :-D I hope you enjoyed the swatches and if you're keen on getting this polish, good luck finding one if you're in Australia. I suggest pre-ordering asap! Until next time...

Related Posts Plugin for WordPress, Blogger...